This week has been spent finishing up some of last week's projects.
I finished the Jalie 2107 shorts, my Angelia shorts, Closet Core Carolyn PJ shorts, and a Closet Core Pouf, and I got started on cutting out the Tartan for the Closet Core Sienna jacket for my friend. (Wow, not bad!)
I have also found out a bit more about the textile workshop I am hoping to do in Japan in the winter or early spring. 🤞
STUPID MISTAKES SECTION
I think this will be a regular feature, especially when I am doing a lot of sewing.
This week....
- my waistband did not quite fit into the waist of the Carolyn PJ shorts. I squeezed out about 1/4 from the waist of the shorts, then took in the waistBAND by that much, making it even smaller 🙄
Jalie 2107 Men's cargo shorts
These are fine. I am just not sure about the fit - they are a bit roomy, but he needs that room to sit, so I am not sure what to do if I make them again!
Carolyn PJ shorts
This makes them a good pair of shorts to wear out in public... they don't scream PJs!
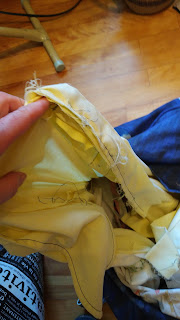
I also tried something new. Whenever I put in a cuff, or waistband, I find it challenging to get the inside lined up correctly, so that when I topstich or stitch in the ditch from the good side, it often does not catch the inner part correctly, driving me crazy.
I also tried something new. Whenever I put in a cuff, or waistband, I find it challenging to get the inside lined up correctly, so that when I topstich or stitch in the ditch from the good side, it often does not catch the inner part correctly, driving me crazy.
I had read a couple of times about doing this backwards, and after my cuff frustrated me, I decided to try this backward technique for the waistband! Brilliant!
First, as usual, I pressed up the seam allowance of one edge. I then sewed the other edge of the waistband to the INSIDE of the shorts, then turned it to the outside, placing the folded up edge just over the seam line. I then topstitched this edge down. This way, my topstitching is even, and if it is a bit wobbly on the inside, it does not matter, since
a) nobody sees it and
b) it is already sewn down.
You can't use this to stitch in the ditch, but stich in the ditch is overrated, anyway😉
 |
| even the insides look nice! |
Angelia Cargo shorts (for me)
The fit of these came out very well, and they will be a practical addition to the wardrobe.
Tartan Sienna Maker Jacket
I have cut it out. I carefully matched the plaid. (I am a bit concerned about one intersection, but fingers crossed I can make it work! No photos at this time!
Scrap-busting pouf from Closet Core
I have wanted to make this for some time. I finally got around to it. Bottom line is that although I used my vast accumulation of itty bitty scraps.... it was still not enough!
I dyed the brown/beige (cafe colour) fabric I had used for the Mitchell muslin for Australia daughter to match the denim theme. Also in there was a bit of beige stretch corduroy from pants which had long been unwearable. This worked well. But if you ever want to do indigo dyeing, don't by the Rit stuff - it is just indigo colour all-purpose dye! I have done proper indigo in the past, and was disappointed with this product! But it was easy!
 |
| don't quite meet in the middle |
 |
| carrying strap |
The pieces all fit together really well. When attaching the circle pieces to the side pieces - fit like magic!
For the piping I found a new and improved way to make continous piping... this is a must watch! I had decorative cord left from some long ago draw string bag projects, so I used that. It made great piping!
Installing the zipper flap... should have been easy, but I had trouble getting my head around it. When I cut out one of the circles, I doubled the seam allowance on one half. I then folded that over to make a flap. Then I kept getting it wrong as I tried to figure out how to sew the zipper on. It did not help that I was using an invisible zipper, but did not realize it until partway through the process, so that accounted for one error!
But if yo want to do do this, here is what I did to add a zipper flap.
I sewed down the flap on the half-circle with the extra seam allowance. In the end it was not enough, so if I were to do it again I would make it twice as wide.
I folded over the seam allowance on the unchanged half-circle, then lined that up with the edge of the zipper TEETH, both with right sides facing up. (That is, from the right side of the circle I could open the zipper.
I then lined up the original stiching line fromt he adjusted half-circle with the stitching line of the piece with the zip. so that the flap covered the zipper. I then sewed the zipper tape to that piece.
The drawstring inner bag that I made was just really patched together from various muslins. It was a real mess; I did not trim or anything.... I made a square which was about as wide as the diameter, and attached somesides to this. In the end I think it could have been even bigger. This misshapen (spelling?) mess was hard to work with!
And boy does it take a lot to fill it!


Your cargo and pj shorts look great! -- W.
ReplyDelete