WISDOM GAINED: I made Hong Kong bias bindings for the first time ever. Not too hard, but it is funny how ... layers upon layers ... I kind of worried about the underside of a part of the garment that is already on the inside! (Stay tuned)

It was so much fun. I am not sure why. I really like the end product; the bodice, with its princess seams, is a nice fit, but I am still left with the collar and V-neck - which is just a bit weird, but I think I will like it.
The funny thing was that when I tried it on to get the before photo, I just slipped it on over my jeans, and did not dislike it as much as I had before.... I briefly reconsidered, and realized that I was still not going to wear it. .. so snip snip! When I sew I always find "the first cut is the deepest" (I actually mean the most unnerving, but Sheryl Crow says it better😉) so after I folded up the dress to get an idea of where to cut, I took a deep breath and cut off the bottom. No turning back.
I proceeded by doing what I felt I had the energy or time for any particular sewing; no particular order. The next step was to sew pieces together to get two lengths long enough for the sleeve (I had kind of thought the bottom would be long enough, but I was okay with the piecing.) Both lengths are pieced in the same way, so I could argue that they are design features!
 |
| Pieced length for sleeve |
 |
| Sleeve placement |
Cutting out the sleeve was a piece of cake.
 |
| Barely visible piecing |
 |
| Collection of Ghanaian waxed cotton |
To add some fun, I selected some waxed Ghanaian cotton from MG for the cuff and for bias binding for the bottom hem. I love these little details.
I thought about doing the sleeve button placket in this cotton as well, but decided against it.
Another decision I made was to add Hong Kong bias binding to as many seams as I could. I have recently begun caring a bit more about my raw edges. I have always zig-zagged them but recently wanted a finer touch, and have been using French seams on a few projects. French seams were not an option on this project, since these seams were already sewn, so I decided to try the binding method. I used a very light (read flimsy) silk-cotton voile left over from another project. This stuff is so hard to work with as it keeps moving! But I was able to make some continuous binding strips (a bit crooked...) and looked up the how-to. I ended up using Closet Core's tutorial. There were three methods: I knew I would have no success with the sandwich method, nor with the modified sandwich method, but I could handle the first method, where you sew your tape to the seam (right side to right side), then fold it over and "stitch-in-the ditch' on the seam allowance to catch the folded over tape. This worked, even if the underside would not stand up to very close inspection. You trim the underside as close to the stitching as you can, but it was hard to get a straight line, for fear of cutting the garment! However, the 'visible' part looks pretty good. And I did get a bit better each time! Some of the previously notched seams look a bit strange, and there were some seams I had to leave since they were partially sewn down by the pocket stitching.  |
| Hong Kong binding of seams |

Earlier this summer I had purged my pattern drawer, but never got around to disposing of the patterns. The pattern for this dress had been put into that box, and when I first thought of this project I wondered if there might be a sleeve option in the pattern. This would make my life easier - drafting a sleeve cap would be a whole new level of skill. However, there it was. I also knew I wanted to use the bottom part of the Kalle sleeve (with its lovely French cuff), so hacking those two patterns together was a piece of cake! I used my paper piecing method with the placket, again, to get things nicely aligned. It looks pretty good... Now that I know what to do it comes together nicely. I sewed the sleeve seam, then wondered if one uses a Hong Kong bias on sleeves before I remembered that since I was actually sewing the sleeve from scratch, I could do a French seam here - so unstitched and redid it. I then added the cuff and did the button holes before tackling the most dreaded part of the project - attaching the sleeve to the bodice.
The armscye had been trimmed in the original dress (to allow for the binding of the sleeveless dress.) I pinned and basted my sleeve, matching what I imagined were the actual sewing lines. It did not fit very well, I got puckers in the sleeve, and it did not sit well to the back. I have gotten better over the years at inserting sleeves, but they can be hit and miss. A bit of research I did while working on this suggests that pattern designers don't all design their sleeve caps very well! After reading a bit I decided to just pin it so that it fit, even if there was extra fabric in the sleeve cap which would be subsequently trimmed. I basted it, tried it on, and decided it worked - as well as it would. Not sure it would meet Mrs. Mole's high standards but given the nature of this project, it was as good as it was going to get!


I also top-stitched (do you call it top stitching if you can't really see it?) and edge-stiched beside the button-holes to make it look a bit like a placket. Possibly too subtle to make a difference.
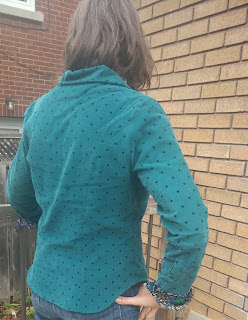
You will notice the curved sides - this was also traced from my Kalle shirt. While I have mentioned I don't love the Kalle, there are several aspects of it I truly like - namely, the sleeve extension with its French cuff, this curved hem-line being two main aspects!
The shirt might be a tad short - but possibly only in comparison to my Kalle shirt! I am delighted, even if the V-neck will be strange! I love the peek-a-boo bias binding hem, the contrast cuff, the curved hem. What I particularly like about this shirt that I did not like so much in the Kalle is the shaping in the bodice. The shirt is more fitted, which is what I am looking for, and why I might do a Liesl shirt as my next shirt. Just not sure which version - the classic or the recital. Probably a combination, but that means I need to buy both patterns! I might also need to merge this bodice with whatever option I find.


Very nice Danielle. You need to come visit me and get some fabric here. It is so CHEAP!!!
ReplyDelete