WISDOM GAINED: Where has this walking foot been all of my sewing life?! What a game changer!
This story starts with three separate stories.
It also gets eyeballs rolling in the S-T household.
 |
| Keeping warm |
PART 1: this winter, while teaching at home online I FROZE. We keep our house cool, and when you sit at a computer without moving you get cold. I would wear knit fingerless mittens, my thick 40 year old authentic Cowichan sweater, and I would cover my legs with a heating pad and a blanket or cover. (See right, except for the Cowichan sweater) My daughters have wool wrap blankets, and I copied this design to convert a lap quilt I had made into a wrap quilt, by cutting a line through one half of the half. I used it like an overskirt and it kept me warm (er). (See below)
 |
| Reshaping an old quilt |
PART 2: my aunt gave me a house coat many years ago which I have used daily in the cold months. I noticed that it was showing serious signs of wear: the elbows were bare and my patching jobs were not cutting it. So obviously, I needed a new house coat.
PART 3: A dear friend gave us a (panel) quilt for our wedding which she had hand quilted. It lived on our bed for MANY years, until a few years ago when I pieced a new quilt. I was not sure what to do with the wedding gift now; other members of the family did not need a quilt, and as it was a handmade gift I did not want to give it away. |
| Wedding present quilt |
SYNTHESIS: (Do you see where this is going?)
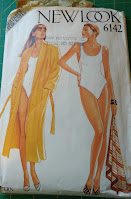
Why not use the quilt to make a house-coat?! Except for new thread, I purchased nothing for this project! I used a New Look beach robe pattern from my pattern collection that I had never used, and I used an old very light mauve bedsheet for the facing. I had to do this in secret, though. Second daughter can be quite judgemental, and she would have rolled her eyes. I wanted to keep it quiet until I could model it as a fait-accompli.
So I cut out at my Dad’s house - where they have a large dining room table with lots of space, and then did the sewing furtively.
I traced the pattern pieces onto my Swedish tracing paper so that I could maximize the cloth. I placed all the pieces temporarily, to check the layout. I was resigned to the idea of having to do the sleeves in two or three panels but managed to get all but one sleeve placed, and was satisfied.
I then pinned the pieces more securely and cut out one piece at a time (I only have a limited number of quilt pins). I repositioned the back piece so that it, like the fronts and sleeve, could be aligned with the edge of the quilt (no hemming required). Lo and behold I was now able to fit all my pieces! No further piecing required!
 |
| Walking foot attachment |
With the new walking foot purchased for this project (OMG where has that been all my sewing life?!) sewing was a breeze. I trimmed the extra batting from the seam allowances…. (but have yet to nicely finish the seam edges!)Did you know that a walking foot is not jus a quilter's friend? Apparently it is useful for keeping your pieces lined up nice and firm, for using with knits, for getting through thick sections, matching lines...
The end result was voluminous! (I had not thought this through entirely: there is no drape in a quilt. Obviously!) So I took it in a bit in two lengths along the back - I was going to do a dart, then just extended it to the bottom. I also added a super huge pocket (the size of one of the panels). It sits a bit high, so I might change it to open at the side instead of the top.
Ultimately, it looks kind of Japanese; kind of like a kimono. I am going to love it come winter. Sure, as bulky as it is, I may not be able to do any baking with it on, but that’s a small price to pay to be warm while I drink my morning coffee! And I do think it is kind of funky!


Very cozy indeed and a great way of repurposing something.
ReplyDeleteHowever, what caught my eye were the gloves. Any chance you could share the pattern? We've returning to the office and it's already cold in there. (I've yet to work in an office tower that was properly heated).
So I am still getting to know how this blog works, and just discovered that I needed to 'moderate' this comment! Here is the link to the Canadian Living pattern for the gloves! https://www.canadianliving.com/home-and-garden/knitting-and-crochet/article/heart-patterned-fingerless-mitts-to-knit
Delete