Wisdom gained: Try out a tricky construction technique on some scrap fabric (on your fashion fabric if you have enough left!)
My local independent fabric shop (Fabrications, Ottawa) sent out a newsletter where they highlighted the Kalle shirt dress. I kind of wanted a shirt dress and so rode out there on my bike (avoided the busy roads, yay!), to possibly buy the pattern. We were coming out of lockdown number 3, and I think I really just wanted to go to a fabric store!
I looked at the pattern with some doubts; it looked kind of boxy. The shop owner said that she thought the same thing at first, but was so impressed with the outcome that she had made several more. And on the internet there were gorgeous iterations.
I really wanted to love the Kalle!
The relationship got off to a rocky start. I decided to make the tunic with popover placket (view B) with the separate sleeve extension out of some yellow and black ‘buffalo plaid’ (I think that's what you call it?) cotton that was not quite flannelette that I had bought on clearance at the local big box fabric shop. I don’t know what I was thinking when I bought it (I do like the yellow and black look, it IS cotton, but boy is it crap;!). Never mind, it was going to be a wearable (or perhaps, not-so-wearable) muslin!

Marking madness: Marking patterns has always been a bit of a challenge - I have usually used thread marking (learned in grade 7 sewing class!); my fabric pencils don’t seem to leave much of a mark, nor does my tracing wheel. I did use the tracing wheel to make the placket cut and sew lines. After I sewed the placket to the front I noticed that one of the stitching lines was not properly placed. My friend Dianne has recently talked about ‘slow sewing’, and I intended to do some slow sewing - meaning taking care to get things right, which meant ripping this out. Not possible! Even with my fancy dandy seam ripper with a beautiful Japanese blade, I could not quite separate the thread from the fabric. Don’t ask - even the black on yellow was hard to do.

Bad, it turns out; When I had cut and folded and sewn the placket down, I could not quite tuck in all the raw edges. It was worse than I can show in the photo here!
No worries - now that I had pracised this technique.... I had plenty of fabric to cut out a new front, and a new placket (I cut this out of the old front, just to make it useful!).
Now here I had a BRAINSTORM
Instead of marking the sewing and stitching lines, I copied them onto another piece of tissue paper, matched it up carefully to some key thread marked spots on the placket AND SEWED THROUGH the paper AND the fabric. I then ripped away the paper. PERFECT! (This idea was adopted from paper piecing, in quilting, which I have never done, incidentally!).

Extra snips: As I cut the opening I realized I had cut through part of the bottom front of the shirt.
I decided to patch it up (used interfacing, a patch on the back, and then a zigzag stitch); it is still visible on close inspection, but this is, after all a casual shirt!!! See the close up!
Encroaching stitches: More errors: the ‘burrito method’ of enclosing the seams in the yoke is easy - once you are doing it; I did need the online tutorial to get it right. But of course here in spite of my best efforts I got some of the tunic caught in the shoulder seam and had to rip out some stitches; not fun). But now with the yoke enclosed and the French seams I adopted, there are no raw edges.
Gussy it up: At this point I realized that I needed some contrast to all of this yellow and black. All I could find that was appropriate in my stash that was black was some black dupioni. Why not! So I cut out a collar stand piece, the upper collar and two (of four) sleeve cuffs. This left me with an extra collar piece - perfect for trying out a new technique.


Analysis: In general, the booklet instructions were okay, but the tutorial was needed in a few spots. The pieces fit together beautifully. I used the bias tape hem facing method - but used a lighter, silk-cotton voile for the bias tape. (I will keep this hem method as a keeper). The thread-tail collar turning technique is a life-changer. If you have never made bias-tape using the continuous cut method - check out this tutorial!
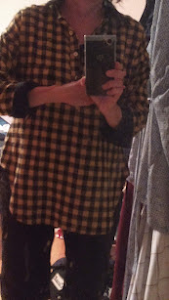
The tunic, however, is not doing much for me. Second (live-in) daughter, who hated the fabric from the moment I bought it on impulse, said it looked like Ebenezer Scrooge’s night shirt. Sadly, I had to agree! But why stop here; I went ahead and did the buttonholes, and added buttons (yellow buttons from my stash; quite cute, actually). I wore it to a cottage gathering and asked for honest feedback. All were impressed by the work and said it was perfect for camping or cottage (silk accents and all!). (Shamelessly fishing for compliments? Perhaps!)
So I figured, while I was at it, I should add the front pocket, since I often do a lousy job on those too. I kind of matched the plaid here - unlike elsewhere in the shirt. That is a technique I will need to learn: I have been admiring gingham shirts recently.
What next: So I am wearing the shirt for casual - very casual - wear, and have gone ahead and cut out the shirt dress (View A; with regular placket), from another clearance find - a turquoise linen/rayon mix. I will contrast with a turquoise and pink paisley(ish) pattern sari. Stay tuned!
Comments
Post a Comment
Feel free to leave a message. I am happy to hear from you. If you post anonymously feel free to leave your first name!